
Protecting your home from pests starts with regular inspections. Here’s why: pests like termites cause over $5 billion in annual property damage in the U.S., and catching issues early can save tens of thousands of dollars in repairs. A professional pest inspection, costing just a few hundred dollars, helps identify hidden threats before they escalate.
Key takeaways:
- Schedule annual inspections (or seasonal in humid climates) to detect issues in areas you can’t easily see, like crawl spaces or behind walls.
- Prepare your home by decluttering, fixing leaks, and ensuring access to key areas like basements and attics.
- Hire professionals for expertise, advanced tools, and thorough inspections. This is especially important when selling your home, as documented inspections can reassure buyers.
- Post-inspection, address issues like sealing entry points, managing moisture, and treating active infestations promptly.
For Pacific Northwest homeowners, pests like rodents, termites, and carpenter ants are common. Regular inspections and preventive action can protect your home’s value and your family’s health.
Discover The Secrets Of The Termite Inspection Process
sbb-itb-be66415
Preparing Your Home for a Pest Inspection
Getting your home ready for a pest inspection is all about making things easy for the inspector. By clearing pathways and ensuring access to key areas, you help them identify issues more quickly and provide a more accurate evaluation. The goal? No obstacles, no missed spots.
Cleaning and Decluttering Before the Inspection
Start by moving large appliances, like your refrigerator or washing machine, to expose hidden areas where pests might hide. Empty out kitchen and bathroom cabinets to give inspectors a clear view of plumbing, and while you’re at it, fix any leaky faucets. This helps differentiate between old water damage and current problems.
In spaces like garages, basements, and attics, shift stored items at least two feet away from the walls. This allows inspectors to check for signs of pests, such as mud tubes, gnaw marks, or small entry points. If your attic access is in a closet, remove clothing beforehand to protect it from dust or insulation during the inspection.
Vacuum carpets, floors, and furniture to eliminate pest eggs or debris. Store pantry goods in airtight containers and make sure counters are free of food or crumbs. Don’t forget to seal and empty all trash cans, both indoors and outdoors.
Once everything is cleaned and decluttered, double-check that all critical areas remain accessible for the inspection.
Areas Inspectors Need to Access
Inspectors will examine your property thoroughly, both inside and outside. Outdoors, clear a two-foot perimeter around your foundation. Move items like firewood, trash cans, garden hoses, and potted plants away from exterior walls. Trim back any tree branches or shrubs that touch your house since these can act as bridges for pests.
Indoors, ensure access panels are easy to reach. This includes attic hatches, crawl spaces, and utility closets housing water heaters or other systems. Inspectors may also check baseboards, window frames, and closets in bedrooms and living spaces, especially if there’s evidence of pests like droppings or damage.
If you have pets, secure them in a crate or take them off-site during the inspection. This keeps them safe and ensures they don’t interfere with the inspector’s work. Make a note of any areas where you’ve noticed signs of pests, such as droppings or nests. Sharing this information helps the inspector focus on problem areas right away.
"A thorough inspection sets the stage for an effective treatment plan and shows clients you know what you’re doing." – Kurt Anderson, Pest Pro University
What Happens During a Pest Inspection
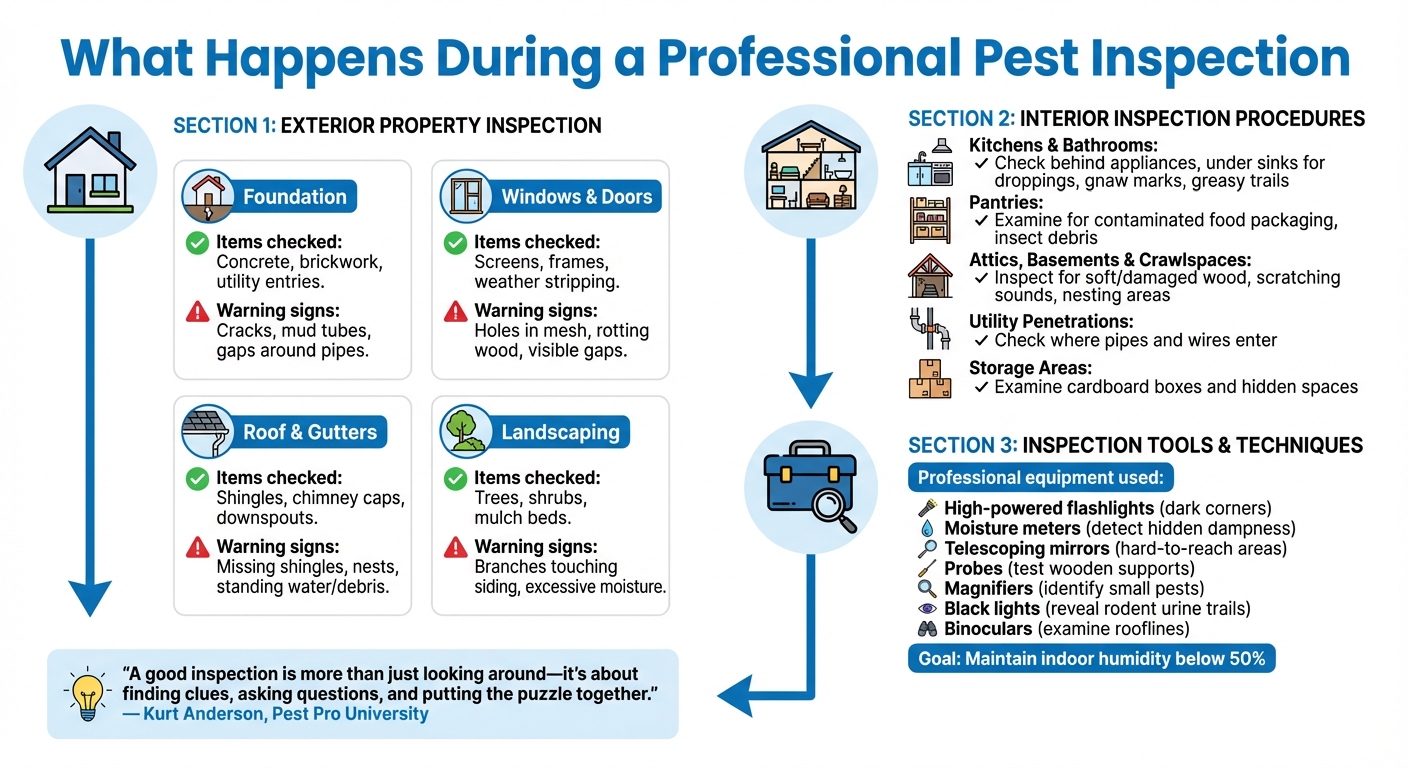
Complete Pest Inspection Process: Exterior to Interior Assessment
Pest inspections start outside your home and gradually move indoors to identify infestations, locate entry points, and assess conditions that could lead to future pest problems.
Exterior Property Inspection
The process kicks off with a thorough walk around the exterior of your home. Inspectors carefully examine the foundation, searching for cracks or gaps – especially around areas where pipes, electrical wires, or cables enter the building. These spots are notorious for allowing pests like rodents and insects to sneak inside. Window and door frames also get a close look to check for gaps, worn-out weather stripping, or rotting wood that pests can exploit.
Rooflines are another key focus. Inspectors look for damaged shingles, missing chimney caps, and debris-filled gutters, all of which can provide shelter or access for pests. They’re also on the lookout for signs of activity, like wasp nests or termite mud tubes (about the size of a pencil). Even landscaping is inspected, as overhanging tree branches, heavy mulch against the foundation, and standing water from clogged gutters can create ideal conditions for pests to thrive.
| Exterior Inspection Area | Specific Items Inspected | Signs of Trouble |
|---|---|---|
| Foundation | Concrete, brickwork, and utility entries | Cracks, mud tubes, and gaps around pipes |
| Windows & Doors | Screens, frames, and weather stripping | Holes in mesh, rotting wood, and visible gaps |
| Roof & Gutters | Shingles, chimney caps, and downspouts | Missing shingles, nests, and standing water or debris |
| Landscaping | Trees, shrubs, and mulch beds | Branches touching siding and excessive moisture in mulch |
Once the exterior inspection is complete, the focus shifts indoors to areas most vulnerable to pest activity.
Interior Inspection Procedures
Inside the home, inspectors prioritize kitchens and bathrooms, which tend to attract pests due to the availability of food and moisture. They might move appliances to check behind refrigerators or under sinks, looking for droppings, gnaw marks on wires, or greasy trails along baseboards. Pantries are closely examined for contaminated food packaging or insect debris.
Attics, basements, and crawlspaces receive careful attention, as these dark and often damp spaces are prime nesting grounds. Inspectors check for soft or damaged wood – an indicator of termite activity – and may listen for scratching sounds in walls. They also inspect utility line penetrations and storage areas with cardboard boxes, which can serve as hiding spots for pests.
"A good inspection is more than just looking around – it’s about finding clues, asking questions, and putting the puzzle together." – Kurt Anderson, Pest Pro University
These detailed interior checks help uncover hidden problems and guide the next steps in pest management.
Tools and Techniques Inspectors Use
Inspectors rely on a variety of specialized tools to spot issues that might not be immediately visible. High-powered flashlights are used to illuminate dark corners and crawlspaces, while moisture meters help detect hidden dampness in walls or wood – conditions that can attract pests like termites and cockroaches. Telescoping mirrors allow them to inspect hard-to-reach areas, such as behind heavy furniture or into tight crevices.
Other tools include probes for testing wooden supports, magnifiers for identifying small pests, and black lights to reveal rodent urine trails. Binoculars come in handy for examining rooflines and other high areas. These tools ensure a thorough assessment of your home’s pest situation, helping to identify vulnerabilities and maintain indoor humidity at levels below 50% – a key factor in keeping infestations at bay. By understanding these methods, homeowners can better engage with inspectors and take informed action based on their findings.
Understanding Your Inspection Report and Next Steps
How to Read Your Pest Inspection Report
A pest inspection report provides a detailed overview of any pest activity in your home. It highlights active or past infestations, identifying specific culprits like carpenter ants, rodents, or wood-boring beetles. Physical evidence is documented, such as droppings (commonly referred to as "frass" in termite inspections), mud tubes along foundations, exit holes in wood, or greasy marks left by rodents.
The report also points out conditions that could attract pests. These might include standing water from clogged gutters, wood-to-earth contact near the foundation, or overgrown vegetation brushing against the house. Many modern reports include photos of the damage or evidence, and some even use thermal imaging to spot hidden moisture or nests behind walls.
Importantly, the report separates structural concerns from cosmetic ones. Issues involving the foundation, roof, or load-bearing wood demand immediate attention, as they can affect your home’s safety and insurance coverage. However, areas that cannot be accessed without causing damage – such as sealed walls – are typically excluded. Use the report as a prioritized checklist to decide which repairs need urgent action and which can wait. This step-by-step approach ensures that you address the most critical problems first, setting the stage for effective pest control measures.
Scheduling Pest Control Services After an Inspection
Once you’ve reviewed your inspection report, it’s time to act. Start by addressing the issues identified:
- Seal entry points using caulk, steel wool, or vinyl concrete patches to close gaps around utility lines, foundation cracks, and door frames.
- Fix leaking pipes, clear out blocked gutters, and use dehumidifiers in crawlspaces to keep humidity levels around 40%.
- Trim tree branches so they’re at least 6 feet from your roof, and keep plants at least 12 inches away from walls to eliminate easy access points for pests.
If your report reveals active infestations or structural risks, like termites, consult a licensed pest control professional. Make sure the company is licensed, bonded, and insured in your state. Request a tailored treatment plan that includes both immediate solutions – such as traps, heat treatments, or EPA-approved pesticides – and long-term prevention strategies. For households with children or pets, ask about non-toxic treatments or ensure traps are placed in secure, inaccessible areas.
For homeowners in Bellingham, WA, and nearby areas, Sparrow’s Pest Control offers free inspections and customized extermination plans. They handle pests like ants, spiders, rodents, wasps, fleas, and cockroaches, using family- and pet-safe methods. Their services come with a 100% satisfaction guarantee. Monthly plans start at $39 for homes up to 2,500 square feet, with options tailored to your specific needs. Given the unique pest challenges and climate of the Pacific Northwest, regular monthly or quarterly visits may be the best way to maintain a pest-free home.
Common Pests in the Pacific Northwest
Once your home is prepped and inspected, knowing which pests are common in the Pacific Northwest can help you fine-tune your pest control efforts. Thanks to the region’s climate, pests remain active throughout the year, with activity often peaking in the fall.
Rodents, Ants, and Spiders
Rodents – like mice, rats, and squirrels – are some of the most frequent fall invaders. As temperatures drop, they seek warmth and shelter, often sneaking in through cracks in foundations, roof vents, or chimneys. Signs of rodent activity include droppings, gnaw marks on wires and insulation, and scratching sounds in walls or attics.
Ants are another challenge in this region. Carpenter ants, for example, tunnel through moist or rotting wood, leaving behind sawdust-like debris called frass. Pharaoh ants, tiny yellow-brown insects less than 1/16 inch long, prefer warm, humid areas like wall voids or behind baseboards, making them especially hard to eliminate. Moisture ants are drawn to areas with water damage. When inspecting for ants, keep an eye out for trails, frass piles, and activity near damp wood or plumbing fixtures.
Spiders become more noticeable in the fall as mating season ramps up, leading to an increase in webs and egg sacs indoors. While most spiders are harmless, three species in the Pacific Northwest deserve caution: the Yellow Sac spider (known for its painful bite), the Black Widow (whose venom affects the nervous system), and the Hobo spider. Look for webs in corners, basements, and crawl spaces, as well as silk tubes or sacs that indicate nesting. Recognizing spider activity can guide your next steps in pest control.
Wasps, Fleas, and Cockroaches
Wasps and hornets often build nests on outdoor structures during warmer months. Their ability to sting multiple times makes them a safety concern. Regularly check common nesting spots, especially in spring and summer when colonies are most active. Professional removal is often the safest way to prevent them from returning to the same location.
Fleas typically enter homes on pets that have been outdoors. Once inside, they multiply quickly in carpets, pet bedding, and upholstery. The Pacific Northwest’s humidity helps fleas thrive, so regular pet treatments are crucial. Cockroaches, though less common in colder climates, flourish during the region’s wet and humid seasons. These hardy pests can survive for months without food and up to two weeks without water. They often hide in dark, damp spaces like behind baseboards, under sinks, and in wall voids. Look for droppings, egg casings, and a musty odor in these areas, as cockroaches can spread diseases and exacerbate asthma symptoms. Spotting these pests during inspections allows you to focus on targeted treatments.
Conclusion: Maintaining a Pest-Free Home with Regular Inspections
Keeping your home free from pests starts with regular inspections, especially in regions like the Pacific Northwest, where hidden infestations are common. Early detection is key – pests like termites and carpenter ants often remain unnoticed until they’ve caused significant damage. Catching these issues early can save you from costly repairs down the line.
"Pests are often adept at hiding, and by the time you see a visible infestation, the problem may be more extensive than you realize." – Long Pest Control Inc.
Professional inspections, ideally scheduled annually, can uncover problems in hard-to-reach places like crawl spaces, attics, and wall voids – areas that are challenging to check on your own. Between these inspections, simple steps like sealing foundation cracks, managing moisture levels, and trimming back vegetation can help reduce the risk of infestations.
For homeowners in Bellingham and nearby areas, Sparrow’s Pest Control provides detailed inspections, tailored treatment plans, and prevention strategies designed for the specific challenges of the Pacific Northwest. Their trained inspectors use advanced tools, such as moisture meters and UV flashlights, to detect issues early. Plus, their family- and pet-safe methods come with a 100% satisfaction guarantee. With budget-friendly plans, they make proactive pest management far more affordable than dealing with emergency repairs.
"The expense of regular pest control services is a fraction of what you might end up paying for repairs and medical bills after an infestation." – Eastside Exterminators
Given that around 14.8 million U.S. households report rodent sightings each year, incorporating regular pest inspections into your annual home maintenance routine is a smart move. It’s an investment that helps protect your home’s structure, saves money, and provides lasting peace of mind.
FAQs
How often should I get a pest inspection for my home?
For most single-family homes, it’s a good idea to schedule a pest inspection once a year. However, if your home is older, made of wood, or located in a warm, humid area, you might need to step it up. In these higher-risk situations, inspections every 6 months – or even every 3–4 months – can make a big difference. Staying on top of inspections helps catch pest problems early and prevents expensive damage to your home.
How should I prepare my home for a pest inspection?
To prepare for a thorough and hassle-free pest inspection, follow these steps:
- Tidy up the exterior: Trim any shrubs, vines, or plants that touch your house. Move items like trash cans or firewood at least 2 feet away from the walls to reduce hiding spots for pests.
- Provide indoor access: Shift furniture or appliances slightly away from walls and clear out cluttered areas like basements, garages, and closets. This makes it easier for the inspector to examine potential problem areas.
- Clean and secure your space: Store food in airtight containers, wipe down surfaces to eliminate crumbs, and keep pets in a separate room during the inspection to avoid any disruptions.
- Open up key areas: Ensure spaces like attics, utility rooms, and storage areas are accessible so the inspector can check for hidden signs of pests.
These simple steps will make it easier for the inspector to pinpoint any issues quickly. For those in Bellingham, WA, Sparrow’s Pest Control offers expert inspections and treatments using family- and pet-friendly solutions to keep your home pest-free.
What are the common signs of a pest infestation in the Pacific Northwest?
If you’re in the Pacific Northwest, there are key signs to watch for that could indicate a pest problem in your home. Keep an eye out for visible pests such as ants, spiders, or rodents. You might also find droppings – small pellets, dark smudges, or stains – often hidden in spots like cabinets, baseboards, or basements.
Other clues include chew marks on furniture or wires, nesting materials like shredded paper or fabric tucked into corners, and wood damage, such as hollowed or softened timber, which could point to termites or carpenter ants. During cooler months, you may notice spider webs, stink bugs, or even scratching noises in your walls as pests move indoors for warmth.
If any of these signs sound familiar, it’s wise to arrange a professional pest inspection right away to protect your home and avoid further issues.